Can we go on stage and practice?
YES! Use the link to your stage that was sent to you -- you can get on there any time and practice, set up the stage, etc. If you practice sending messages in the "Discuss" (chat) and want those removed before your audience shows up, ask Dona to delete them.What is your "stage" like?
Each session has a separate stage with a "backstage" where you can meet co-presenters and prepare your stage. When you are backstage, no one can see or hear you.To present to your audience, you need to "go live" -- that puts you on stage in front of your audience! You can tell whether you are live or backstage by looking at the bottom left of the screen -- it will say either "live" or "backstage"
NOTE: When you are presenting the same session twice, you will have a separate stage for each presentation.
What do I as a presenter need to know?
In order to present, you must be able to "go live" from the backstage, and you may want to be able to share your screen. This page explains how to do both, either visually or by using a screen reader.There are many other tasks that may need to be done, such as watching for questions, calling on people from the audience to speak, setting up polls and posting handouts, and these can be challenging for those who are presenting alone, or who are using a screen reader to navigate the platform. . In that case, SOMA has assigned volunteer Stage Managers to help the presenter to manage the other tasks.
Making presenters (and their shared screen) fill the screen
When there is more than one person on the stage, they share the space on the screen. When you are live on stage, you can make one person (including yourself) fill the screen by hovering your mouse over their screen and click on the graphic of their "pin." This is especially useful when they are sharing their screen -- the powerpoint or video that they are sharing then fills the screen for the audience. (NOTE: This only works on the live stage -- if you are backstage or anywhere else, clicking on someone's "pin" only makes that image fill your own screen, not anyone else's).Once you've "pinned" someone and made them fill the screen, you can "unpin" them and make everyone come together on the screen again by hovering over their screen and click on the graphic that says "unpin."
Sharing your screen -- making it accessible
IMPORTANT: How to share your screen is described below separately for visual users and screen readers, but you should know that when sharing your screen, you can either have the audience hear you (while showing your powerpoint or other displays), OR they can hear the sound from the video or sound track that you are sharing on your screen. The audience cannot hear both at the same time. That is, they can either hear you, or they can hear the video that you're showing (and cannot hear you talking).Making your video accessible!
This has important implications for making your video accessible to people who are visually impaired and need a description of what is happening visually in the video! You cannot describe what is happening in the video at the same time that the video is playing.
There are two solutions for describing that is happening in the video:
- Explain what will be visually happening before the video. One presenter plans to stop the video in various places and stop sharing so the audience can hear him while he explains what is about to happen that won't be evident from the sound, and then resume sharing his screen and the video until the next time he needs to describe the action.
- Record your narration and imbed it into the video. For example, one presenter plans to edit her videos to add the narration so that when she shows the video, the audio description can be heard.
Sending participants to the lounge to discuss in small groups
If you plan to send participants into the lounge for a discussion in small groups, let Dona Sauerburger know. She will assign your participants to a group of tables (there may be participants from another session at the same time, or casual visitors) and will give you a number to text when you're ready to broadcast a message for them to come back to your session.When it's time for participants to go into their groups, you can tell them that they are going into small groups for whatever task you assign them, and then tell them:
- to find a seat at one of the tables in the numbered group that you've been assigned;
- that when it is almost time to come back, you will have a message broadcast to everyone on the platform; that message will appear for about 15 seconds in the bottom left of their screen, and then will appear as a message in their "discuss" (chat) box. Tell them what the message will say, so that they are prepared to recognize that it is their reminder.
- however, they should watch their own time in case the message isn't broadcast or they miss it, and come back when they are supposed to;
- if they leave their table by using the "exit room" button (bottom right of the screen), it will bring them back to your session, and they just need to click "join"
- however, they should write down the name of your session (remind them what it is) in case something happens and they need to find their way back to you.
Who is in your audience?
If you click on "audience" you will see a list of everyone who has ever been in this audience or stage -- those who are present have a green dot next to their picture and name.The same is true if you click on "lobby" -- it shows everyone who has ever been on the platform for this conference. The ones with the green dot next to their picture are here now. Whether they are here or not, if you click on the little box next to their name, you can send them a message (the message box is on the very bottom of the message box) -- when they return to the platform, they will see the message.
Getting on stage and managing the features visually

The link that you were sent for your stage should take you to the backstage after you click "join." If you are already on the platform, for example on another stage, you can click on "Stage" on the left side of your screen, search for your session in the list, and click "join."
Once you "join," you should see a screen like the one on the left (except you should see yourself on the screen!). You know you're backstage because the red sign on the bottom left says "backstage" and there is a button on the top of the scrreen (toward the right) that says "Go Live." The name of the session this stage is for is written on the top left corner of the screen.
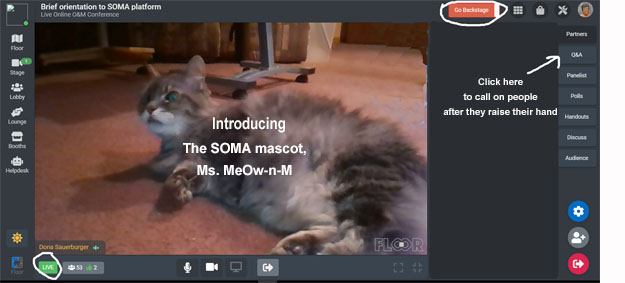 To go live, click on "go live" and you'll be on the stage. On the bottom left it says "LIVE" and where the "Go Live" button was, there is now a button saying "Go Backstage."
To call on raised hands
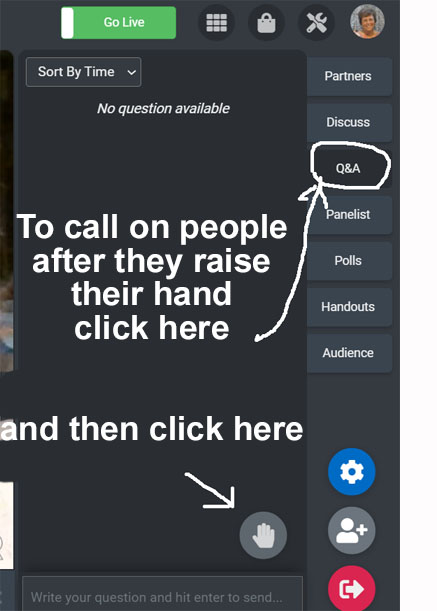
If you see a red dot on "O&A" it means someone has asked a question or raised their hand. Click on the "Q&A" which opens a box showing any questons that were asked. At the bottom of the box is a circle with a hand -- if that has a red dot, it means someone has raised their hand and wants to speak. If you click on that circle with a hand, you'll see the names of people with raised hands. Click on the "invite" button next to their names to allow them to "accept" and appear on stage. Afterwards, they can leave by clicking on their "leave" arrow, or you can hover your mouse over their video till you see the button to have them leave.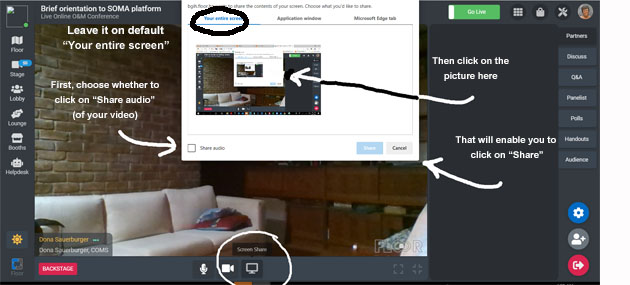
How can we share screen?
Click on "share screen," then choose "entire screen" (it's the default). Before sharing, you need to decide if you want the audience to hear you, or your video -- they can't hear both.- To have them listen to the presenter, just click on the small picture of your screen and then click on "share."
-
To have them listen to the video, click on "share audio" (bottom left of the little share box) before clicking on "share."
Uploading handouts
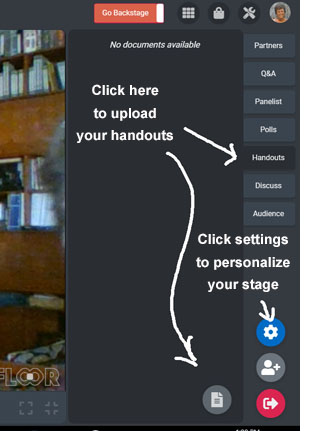
You can upload handouts by clicking on "Handouts," then click again on the circle "manage handouts" at the bottom of the box.
The files must be in pdf format, and SOMA policy requires that those files must be accessible to everyone, including people who are blind or visually impaired and use screenreaders such as JAWS.
You can make your pdf files accessible easily with Adobe Pro, by simply clicking “scan and OCR." then click "recognize text," or generate a txt file by the following: file-> export to -> text (accessible). More information is in their guide
If you would like someone to see if your file is accessible, send it in an attachment to Anthony Lanzilotti -- allow at least a day for him to check it out.
Setting up polls
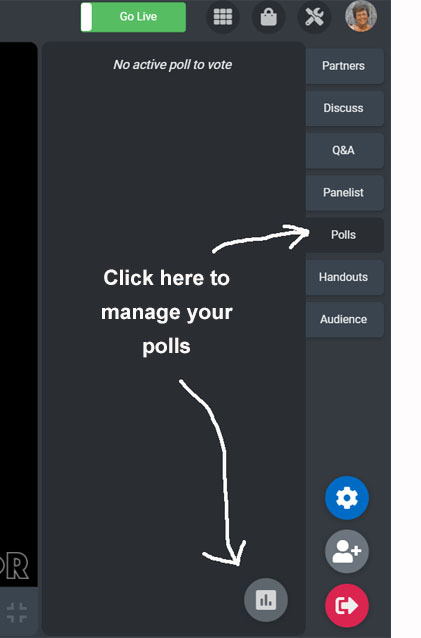
Click on "polls" and then "manage polls," which opens a box where you can click on "create polls." When writing your poll question, be aware that participants cannot choose more than one selection.
Below your poll is where you can choose the status (active if you're ready for participants to select, or closed to wait until later), and choose whether to "show result" to the participants. If you choose "yes" to share results, the participants will not see it until after they vote. We have not yet figured out how to delete a poll, other than keeping it "closed."